Plans for Direstas Dual Drawer Tool Box
Wood Tool Box with Drawer Plans
This footstep by step diy project is near woods tool box with drawer plans. I have designed this simple to brand tool box with a storage drawer, so you can organize your hand tools. In addition, if you lot are new to woodworking, this is a corking opportunity to learn new tricks and techniques. Y'all only demand bones tools and skills to build this project, simply you will also save a significant amount of money. Take a await over the rest of mywoodworking plans, if you lot want to become more building inspiration.
When buying the lumber, you should select the planks with great intendance, making certain they are straight and without any visible flaws (cracks, knots, twists, disuse). Investing in cedar or other weather resistant lumber is a good thought, as it volition pay off on the long run. Utilise a spirit level to plumb and align the components, earlier inserting the galvanized screws, otherwise the project won't have a symmetrical look. If y'all accept all the materials and tools required for the project, y'all could go the task washed in well-nigh a day. Encounter all my Premium Plans HERE.
Projects made from these plans
Building a forest tool caddy with drawer
Edifice-a-tool-box-with-drawer
[tabs tab1="Materials" tab2="Tools" tab3="Time" tab4="Related Plans"] [tab id=i]
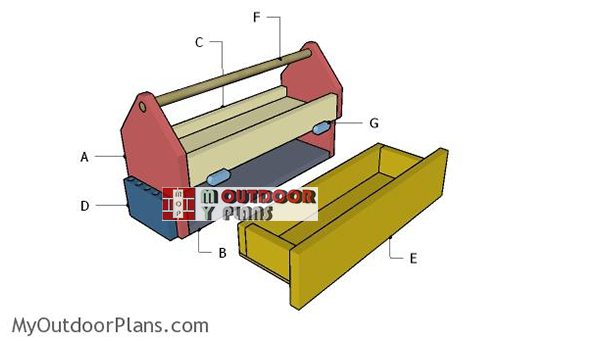
- A – two pieces of 1×8 lumber – 11 1/iv″ long ENDS
- B – ane piece of 1×8 lumber – 18″ long BOTTOM
- C – 2 pieces of one×8 lumber – 18″ long, ane piece of 1×three lumber – 18″ long SHELF
- D – one pieces of 1×half dozen lumber – iii ane/2″ long SUPPORT
- E – 2 pieces of 1×three lumber – 4 ane/iv″ long, 2 pieces – 17 3/4″ long, ane slice of one×6 lumber – 19 1/2″ long, 1 piece of 1/4″ plywood – 5 three/4″ x17 3/4″ long DRAWER
- F – 1 piece of 3/four″ dowel – 19 1/2″ long HANDLE
- 1 piece of 1×8 lumber – 8′
- 1 piece of of 1×3 lumber – 8′
- 3/iv″ dowel
- 3/four″ brad nails, 1 1/2″ brad nails
- forest filler, wood glue, stain/pigment
[/tab] [tab id=two]
Hammer, Record measure, Framing square, Level
Miter saw, Drill machinery, Screwdriver, Sander
Condom Gloves, Safety Glasses
[/tab] [tab id=3]
One day
[/tab][tab id=4]
- Miter saw stand plans
- Tool box plans
[/tab][/tabs]
Woods Tool Box with Drawer Plans
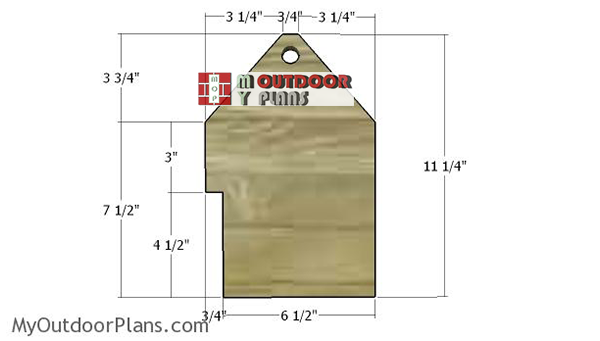
Edifice-the-ends
The first step of the projection is to build the ends for the tool caddy. Mark the cut lines on the one×8 slats and get the chore done with a circular saw. Polish the cut edges with sandpaper for a professional person upshot.

Drilling the handle holes
Marker the center for the handle holes and become the job done with a iii/4″ bit. Make certain you don't utilize also much pressure so you don't tear the edges.

Fitting the side
Fit a 1×8 slat to i side of the tool box. Marshal the edges, making sure the corners are square. Add glue to the joints and insert 1 1/2″ brad nails.
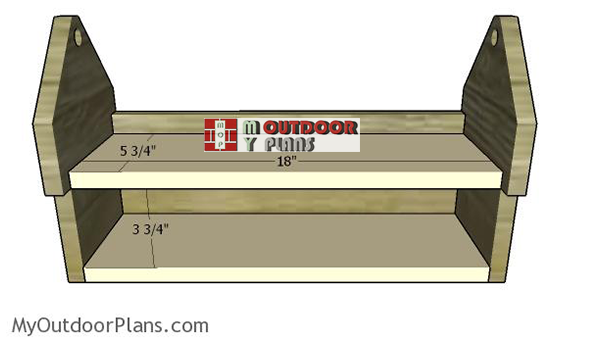
Fitting-the-lesser-slats
Fit the bottom and the shelf to the too caddy, as shown in the diagram. Cut a slice of 1×8 lumber at the dimensions shown in the diagram (5 3/4″x18″). Make sure the corners are square, add glue to the joints and insert i one/2″ nails to lock everything together tightly.

Fitting the side tray
Fit a slice of 1×iii lumber to the other side of the caddy. Fit it to the shelf and to the ends using 1 1/2″ brad nails and glue. Make sure the edges are flush before inserting the brad nails.

Edifice the screwdriver support
Build a screwdriver support from a piece of 1×half dozen lumber. Smooth the cut edges with sandpaper and drill a few holes using a drill printing. Choose the drill bits according to your needs.

Plumbing equipment the screwdriver support
Fit the screwdriver support to one stop of the tool caddy. Apply waterproof gum and a few clamps to lock the support into place tightly.

Fitting the handle
Fit the 3/four″ handle to caddy and lock information technology into place with glue and three/4′" brad nails.
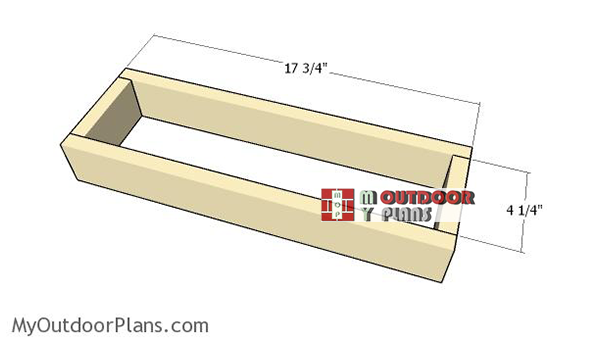
Assembling-the-frame-of-the-drawer
Next, we need to assemble the drawer for the wood tool box. As you can notice in the diagram, you need to build the frame from one×iii lumber. Make sure the corners are square and align the edges flush. Add glue to the joints and use i 1/2″ brad nails.

Drawer bottom
Build the bottom for the drawer from 1/4″ plywood. Align the edges and secure the panel into place with three/iv″ brad nails. Add glue to the joints for a strong bond.

Fitting the drawer face
Fit the drawer to the opening and make sure there is a i/8″ gap on both sides. Next, insert 1 ane/2″ brad nails through the drawer face into the frame.

Fitting the stops
Build small stops for the drawer (3/4″ broad). Drill a airplane pilot holes and secure them to the acme slat using a smash.

Drawer stops
If y'all have followed my plans attentively, the lesser drawer should open easily.

Wood Tool Box with Drawer Plans
Concluding simply not least, you lot need to take care of the finishing touches. Therefore, fill the holes and the dents with forest putty and smooth the surface with 120-220 grit sandpaper. Next, apply a few coats of stain or other stop to protect the components. Seal the finish with a few coats of lacquer.

Wood Tool Caddy Plans
This tool box with a drawer is a dainty project and it volition help you organize your hand tools. This is a simple one day project, so you should non find information technology difficult to get together it. If you build this, I would beloved to see your project.
This woodworking project was aboutwood tool box with drawer plans free. If yous desire to see more than outdoor plans, check out the rest of our pace past step projects and follow the instructions to obtain a professional consequence.
About The Author
Ovidiu
I've been a designer and a woodworker since I first developed consciousness.
Source: https://myoutdoorplans.com/workshop/wood-tool-box-with-drawer-plans/
0 Response to "Plans for Direstas Dual Drawer Tool Box"
Post a Comment